
JavaScript Unwrapped (Part III): Strings & Template Literals, Type Conversion & Coercion, if-else and Hoisting
Topics: Strings & Template Literals, Type Conversion & Coercion, if-else and Hoisting

JavaScript Deep Dive: Exploring Strings, Type Conversion & Coercion, if-else and Hoisting
In our previous articles, we've already covered the basics of let, const, and var, and we've discussed operators and their significance in JavaScript. If you missed those, be sure to check them out to get a solid foundation!
Now that you've got the fundamentals down, it's time to take a deeper dive into some more advanced concepts that every JavaScript developer should master. In this article, we'll be exploring Strings and Template Literals, Type Conversion and Coercion, powerful switch statement, if-else statements and Hoisting
These concepts might seem simple at first glance, but they form the backbone of writing clean, efficient, and readable JavaScript code. So, let's get into it!
Strings and Template Literals: JavaScript's Wordplay Wizardry
Ever found yourself tangled in a mess of plus signs trying to string together some text in JavaScript? Been there, done that. Concatenating strings using the good old + operator can feel like playing a game of "connect the dots" where the dots are tiny and your patience is running thin. But fear not — JavaScript has a sleek solution: Template Literals.
Let's start with the traditional approach. Suppose you want to introduce your friend Alex, who is a teacher born in 1991. Fast forward to the year 2037, and you want to tell the world that Alex is now 46 years old. With string concatenation, it would look like this:
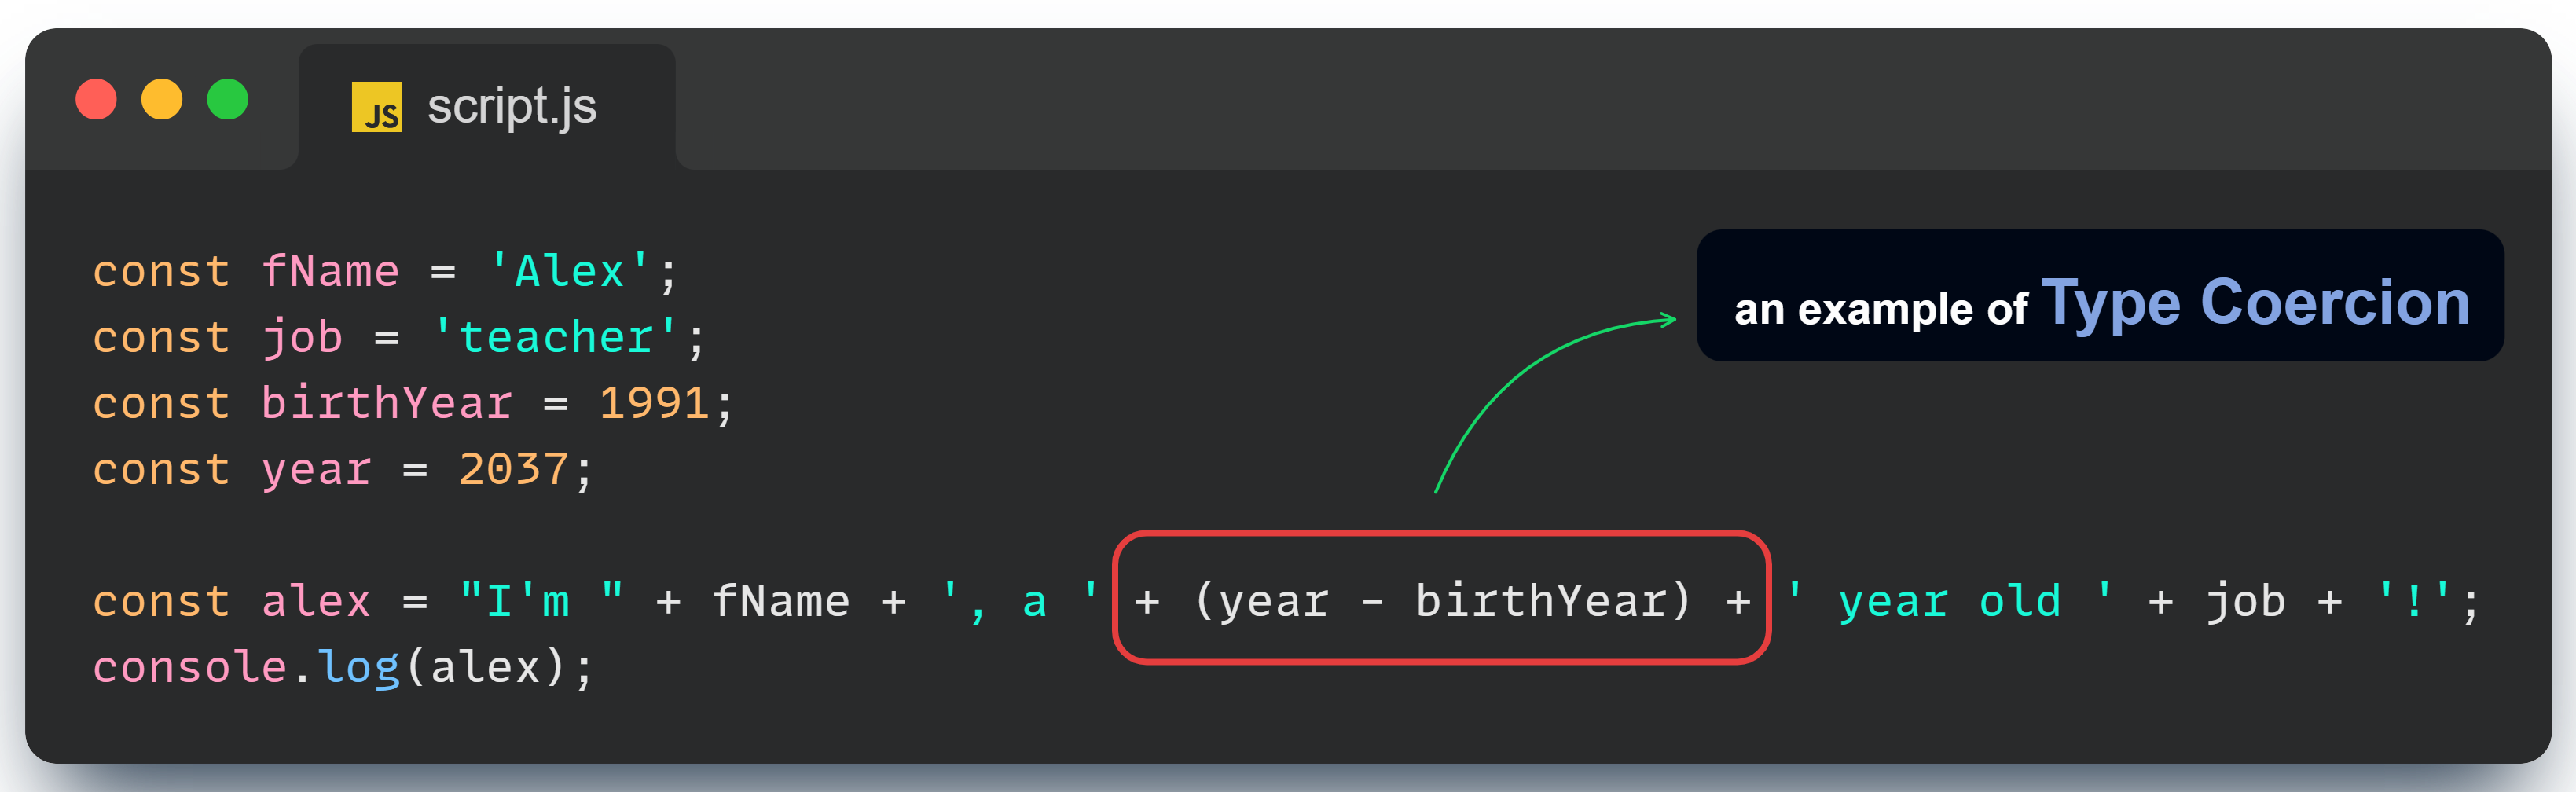
That’s a lot of + signs and quotation marks to juggle, right? It works, but it’s not exactly elegant. Lets introduce template literals — a feature that’s as cool as it is powerful. Using template literals, you can write the same thing in a cleaner, more readable way:
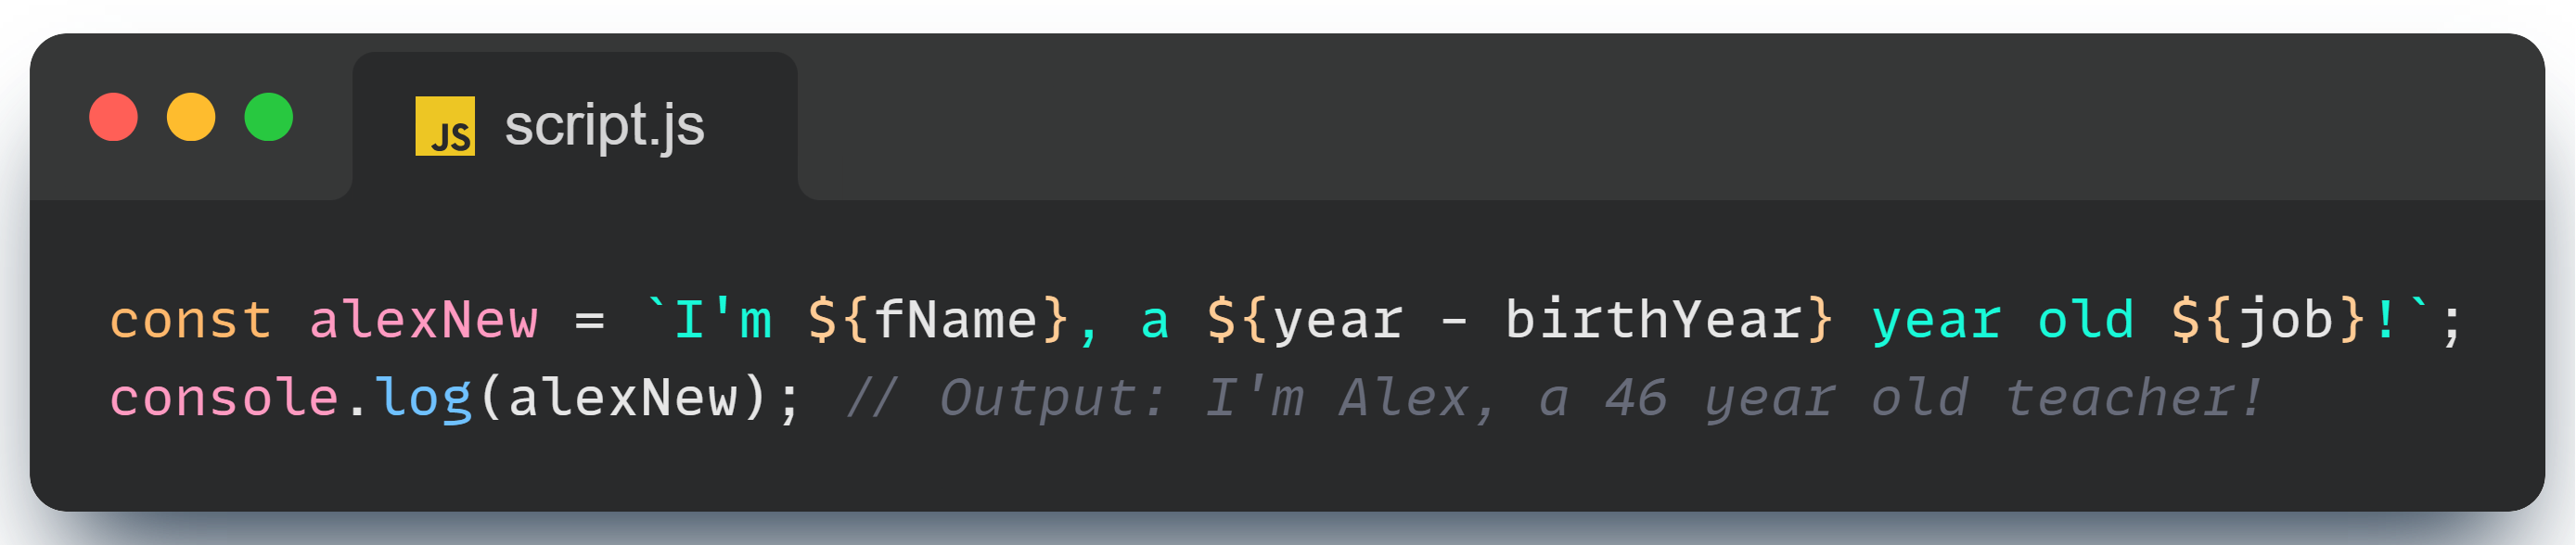
With template literals, your code is no longer a mess of concatenation. Instead, it’s straightforward and easy to understand. Notice those backticks `` instead of the usual quotes? They’re what makes this magic happen. Inside them, you can embed any JavaScript expression using ${}—no fuss, no muss.
But wait, there’s more! Template literals also handle multi-line strings like a pro:

No more \n\ to force new lines. Just write your string as you’d like it to appear, and JavaScript will handle the rest. It’s as simple as that!
So next time you find yourself about to mash together strings with +, stop and switch to template literals.
Type Conversion and Coercion: JavaScript’s Magic Tricks
JavaScript is a quirky language, and one of its most fascinating quirks is how it handles different types of data. Ever wondered why '5' + 5 equals '55' or why Number('Alex') returns NaN? Buckle up, because we’re diving into the world of type conversion and coercion, where JavaScript works its behind-the-scenes magic.
Type Conversion: Making Data Fit
Type conversion is like a formal introduction between different types of data. Sometimes, you need to explicitly tell JavaScript to convert a string to a number or vice versa. Let’s look at an example:
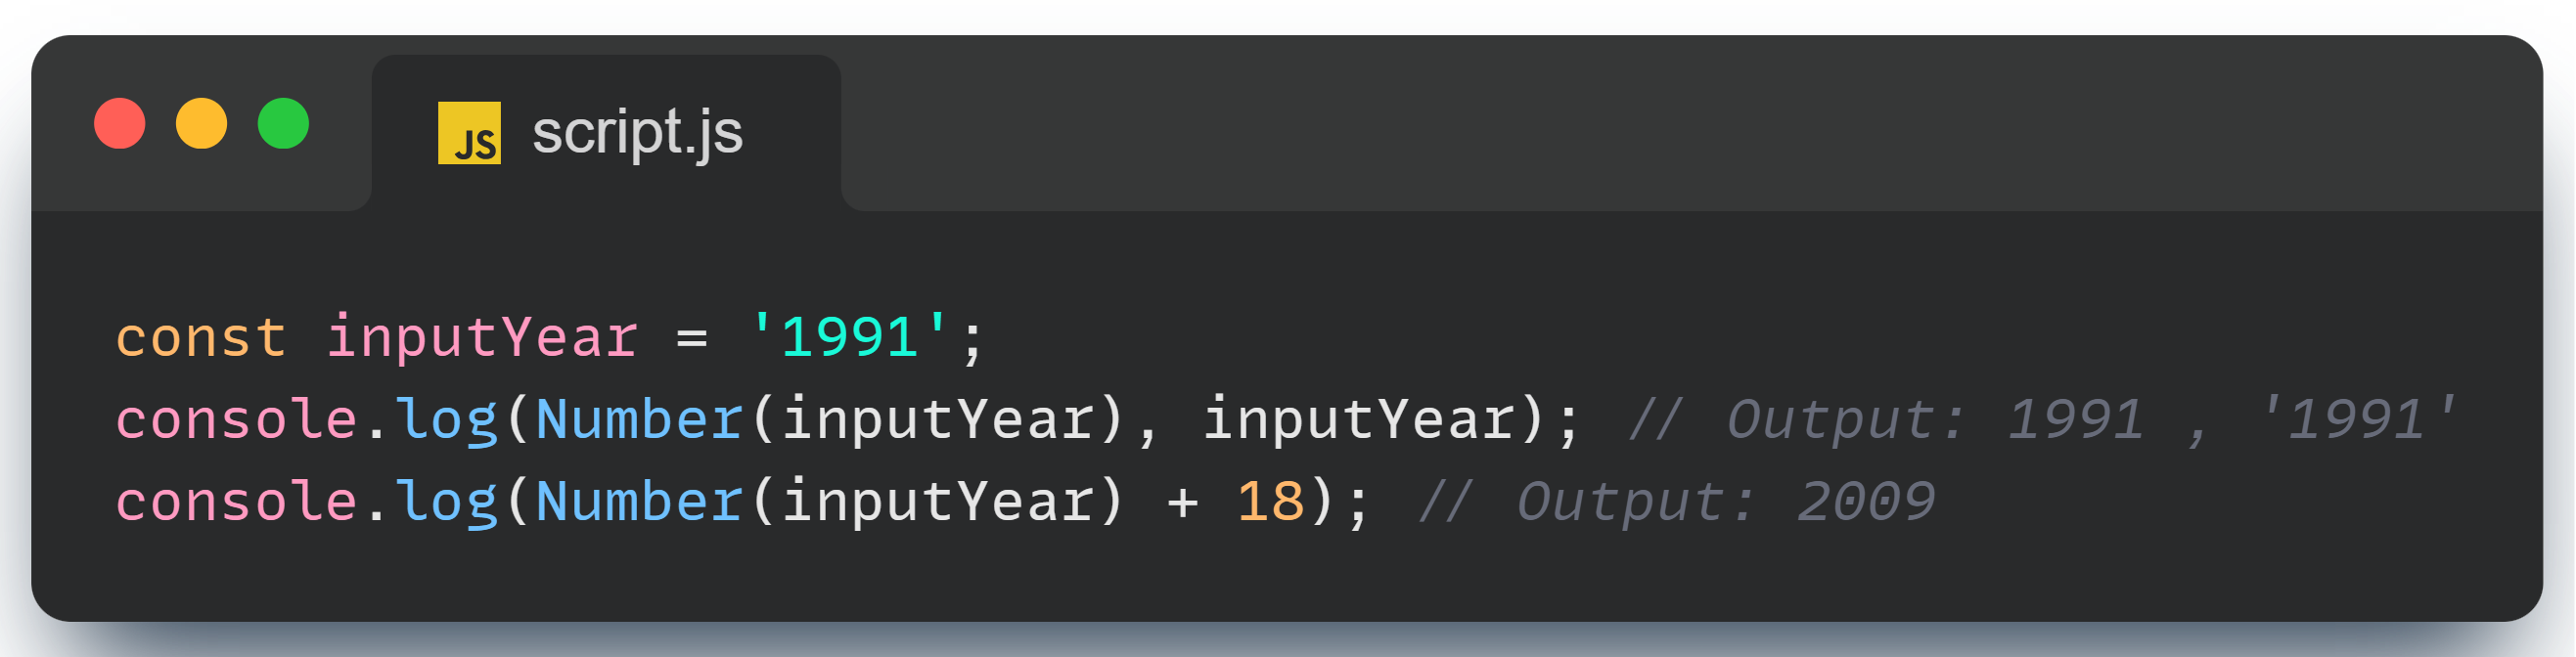
Here, you have a string '1991', but to do math with it, you convert it to a number using Number(). Voilà! You can now add 18 to it without a hitch.
But what happens if you try to convert a string that isn’t a number?
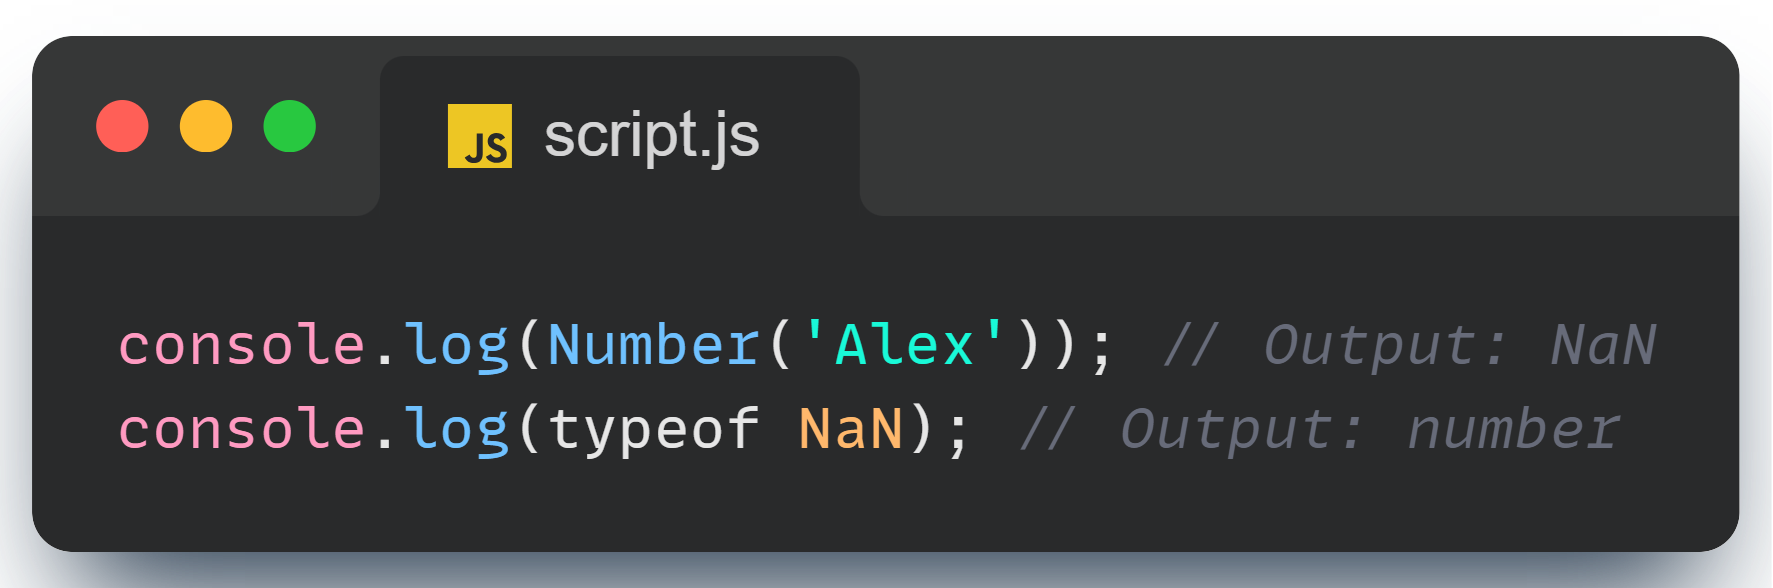
When you try to convert 'Alex' into a number, JavaScript returns NaN (Not a Number).
Fun fact: NaN is still considered a number type in JavaScript. It’s a bit like calling something a "non-existent apple"—it’s not an apple, but it still falls under the category of apples.
Check this out:
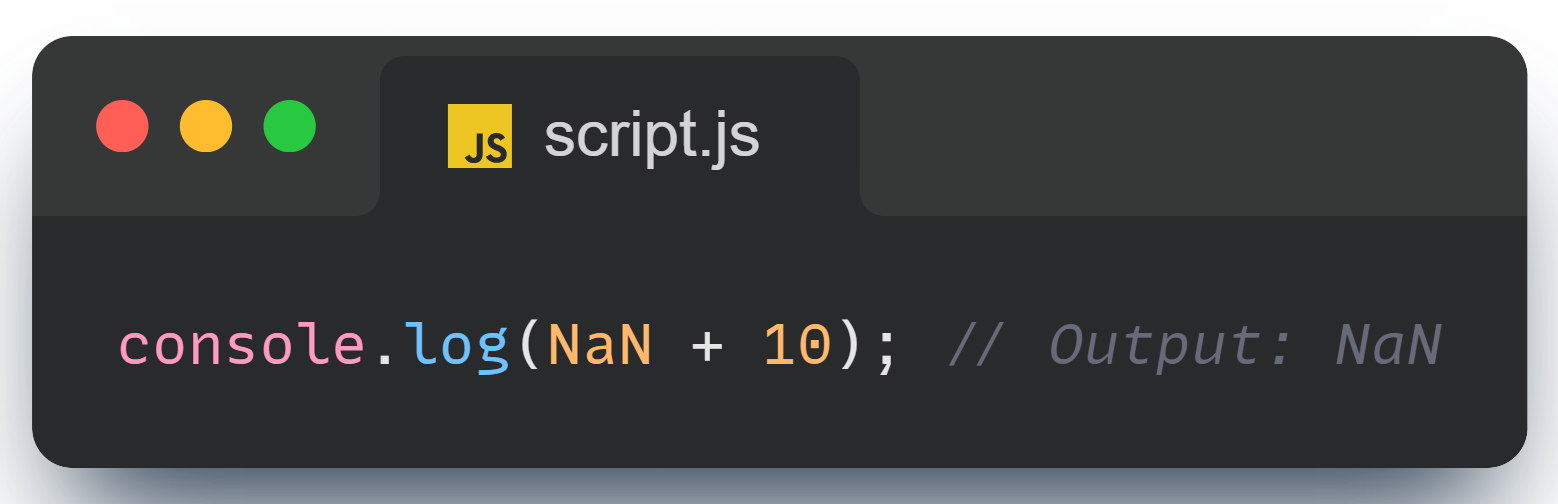
Even if you try to add something to NaN, it stays NaN. It’s like trying to add something to nothing — still nothing!
Type Coercion: When JavaScript Plays It Cool
Unlike type conversion, type coercion is when JavaScript automatically converts data types on the fly. JavaScript tries to be helpful by guessing what you mean, sometimes with surprising results.

In this case, JavaScript coerces the number 23 into a string, so you end up with 'I am 23 years old'. But look what happens when you subtract strings:
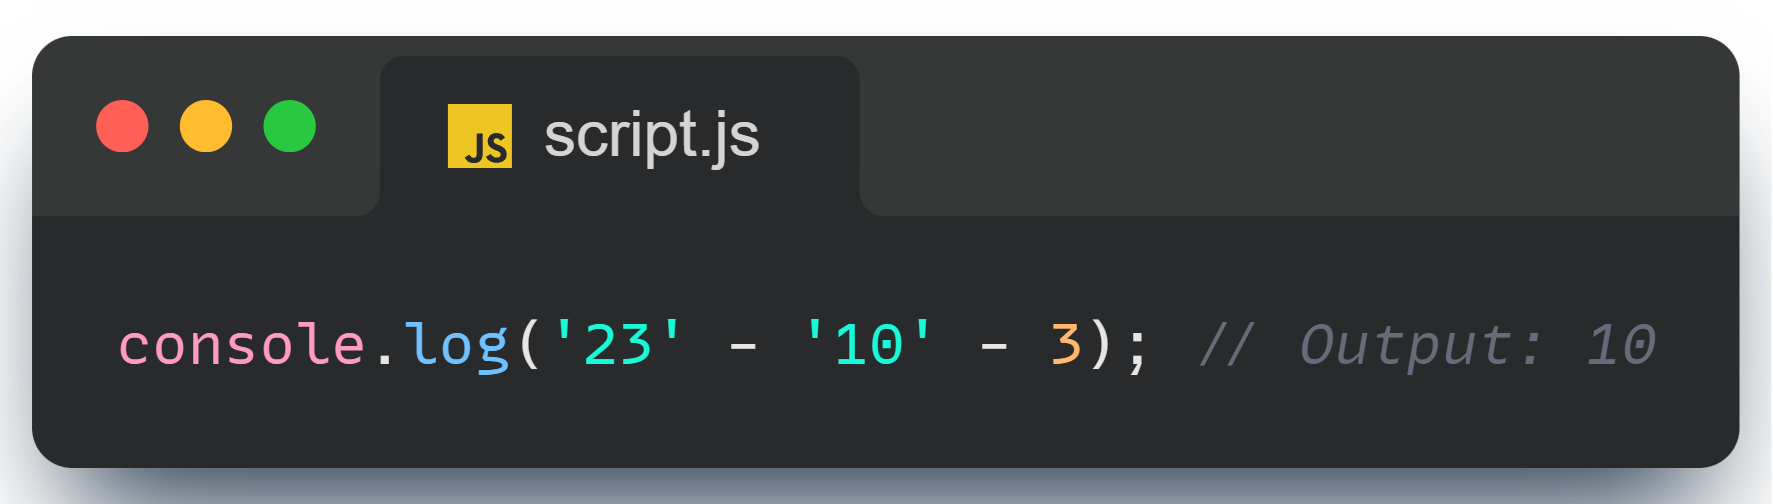
Here, JavaScript treats the strings '23' and '10' as numbers because you’re using the subtraction operator -, which only works with numbers. The result is the number 10.
But JavaScript’s coercion can get even more unpredictable:
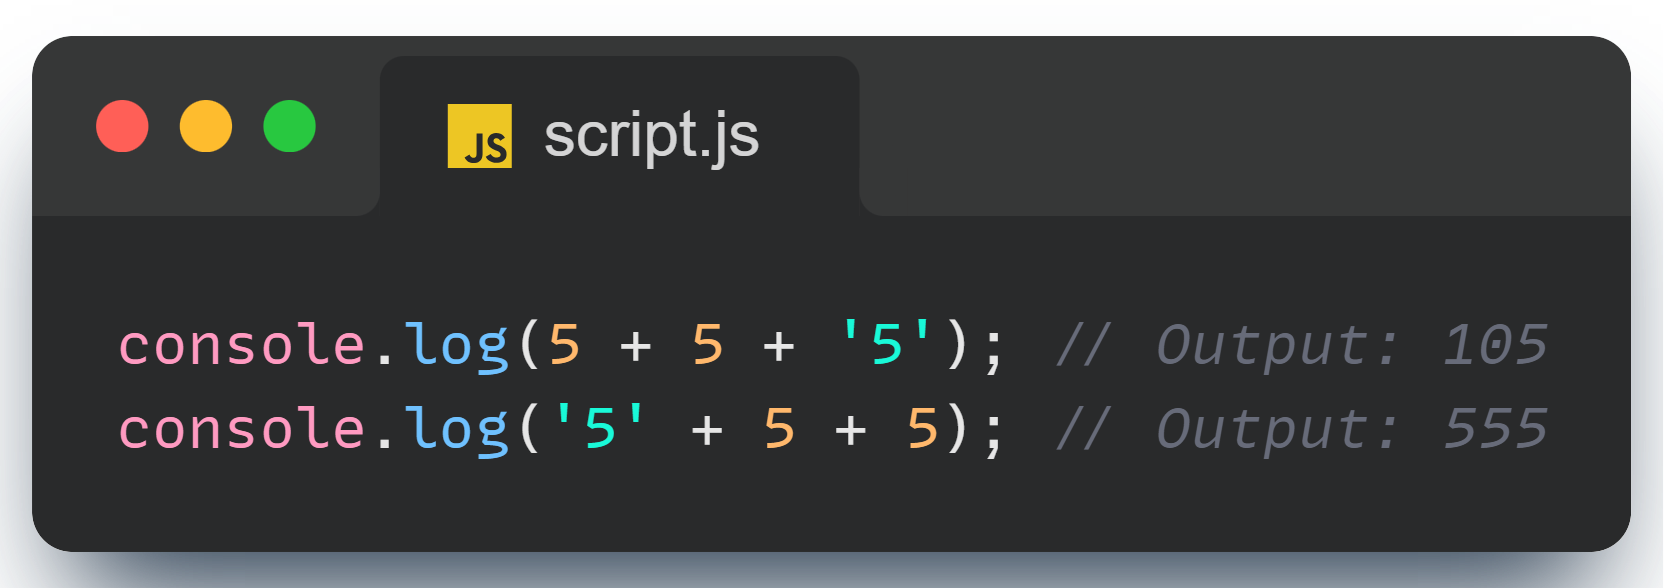
In the first line, 5 + 5 equals 10, which is then coerced into the string '10', and when you add '5', you get '105'. But in the second line, JavaScript starts by concatenating '5' with 5, resulting in '55', and then adds another 5 to get '555'.
One more twist:
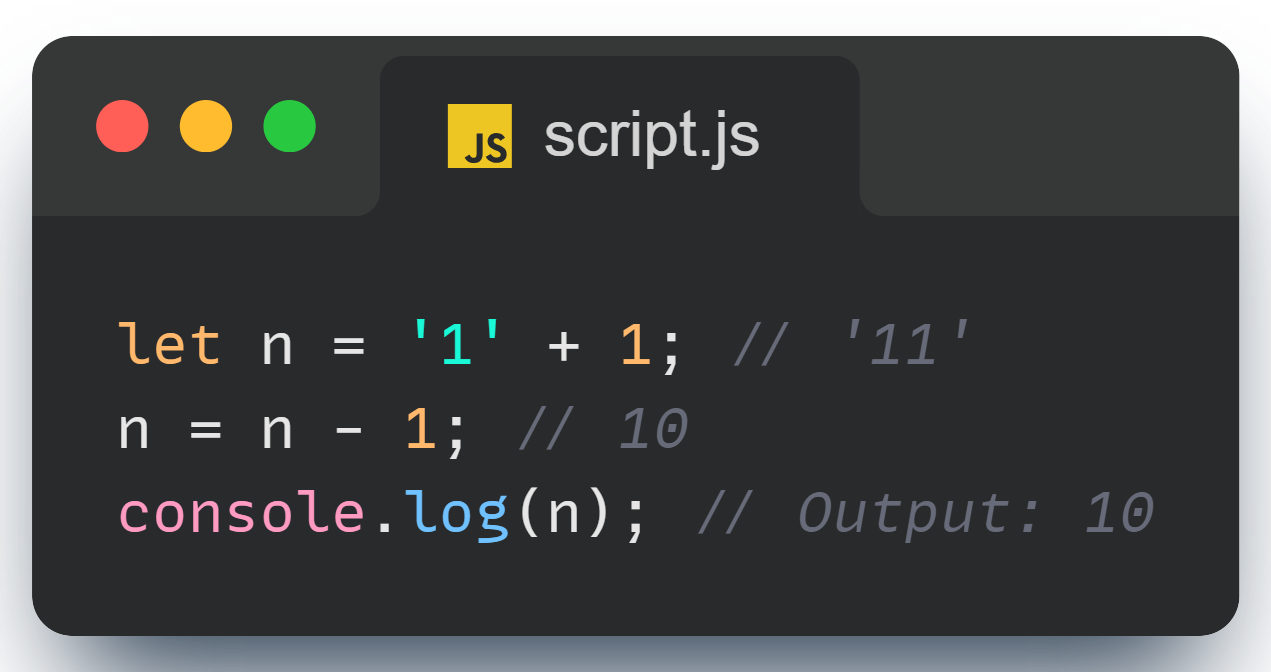
In the first line, '1' + 1 results in the string '11'. But when you subtract 1, JavaScript coerces '11' into a number and does the math, so n becomes 10.
Why Does This Matter?
Understanding type conversion and coercion is key to mastering JavaScript. These quirks can lead to unexpected behavior in your code, but they also give you powerful tools to manipulate data types effectively. By getting familiar with how JavaScript handles different types, you can write cleaner, more predictable code.
So next time you see something like '5' + 5, you’ll know exactly what’s going on behind the scenes.
Mastering Control Flow in JavaScript: The Switch Statement vs. If-Else
When it comes to making decisions in your code, JavaScript offers powerful tools to handle different scenarios based on variable values. Two of the most commonly used constructs for this are the switch statement and the if-else chain. Each has its strengths, and understanding how they work can help you write cleaner and more efficient code. Let’s dive into both with a fun example to illustrate their use.
The Switch Statement: A Clean Approach
Imagine you’re planning out a week of tasks and you want to decide what to do based on the day of the week. The switch statement is perfect for this kind of situation where you have a variable that can take on multiple discrete values. Here’s how you might use it:
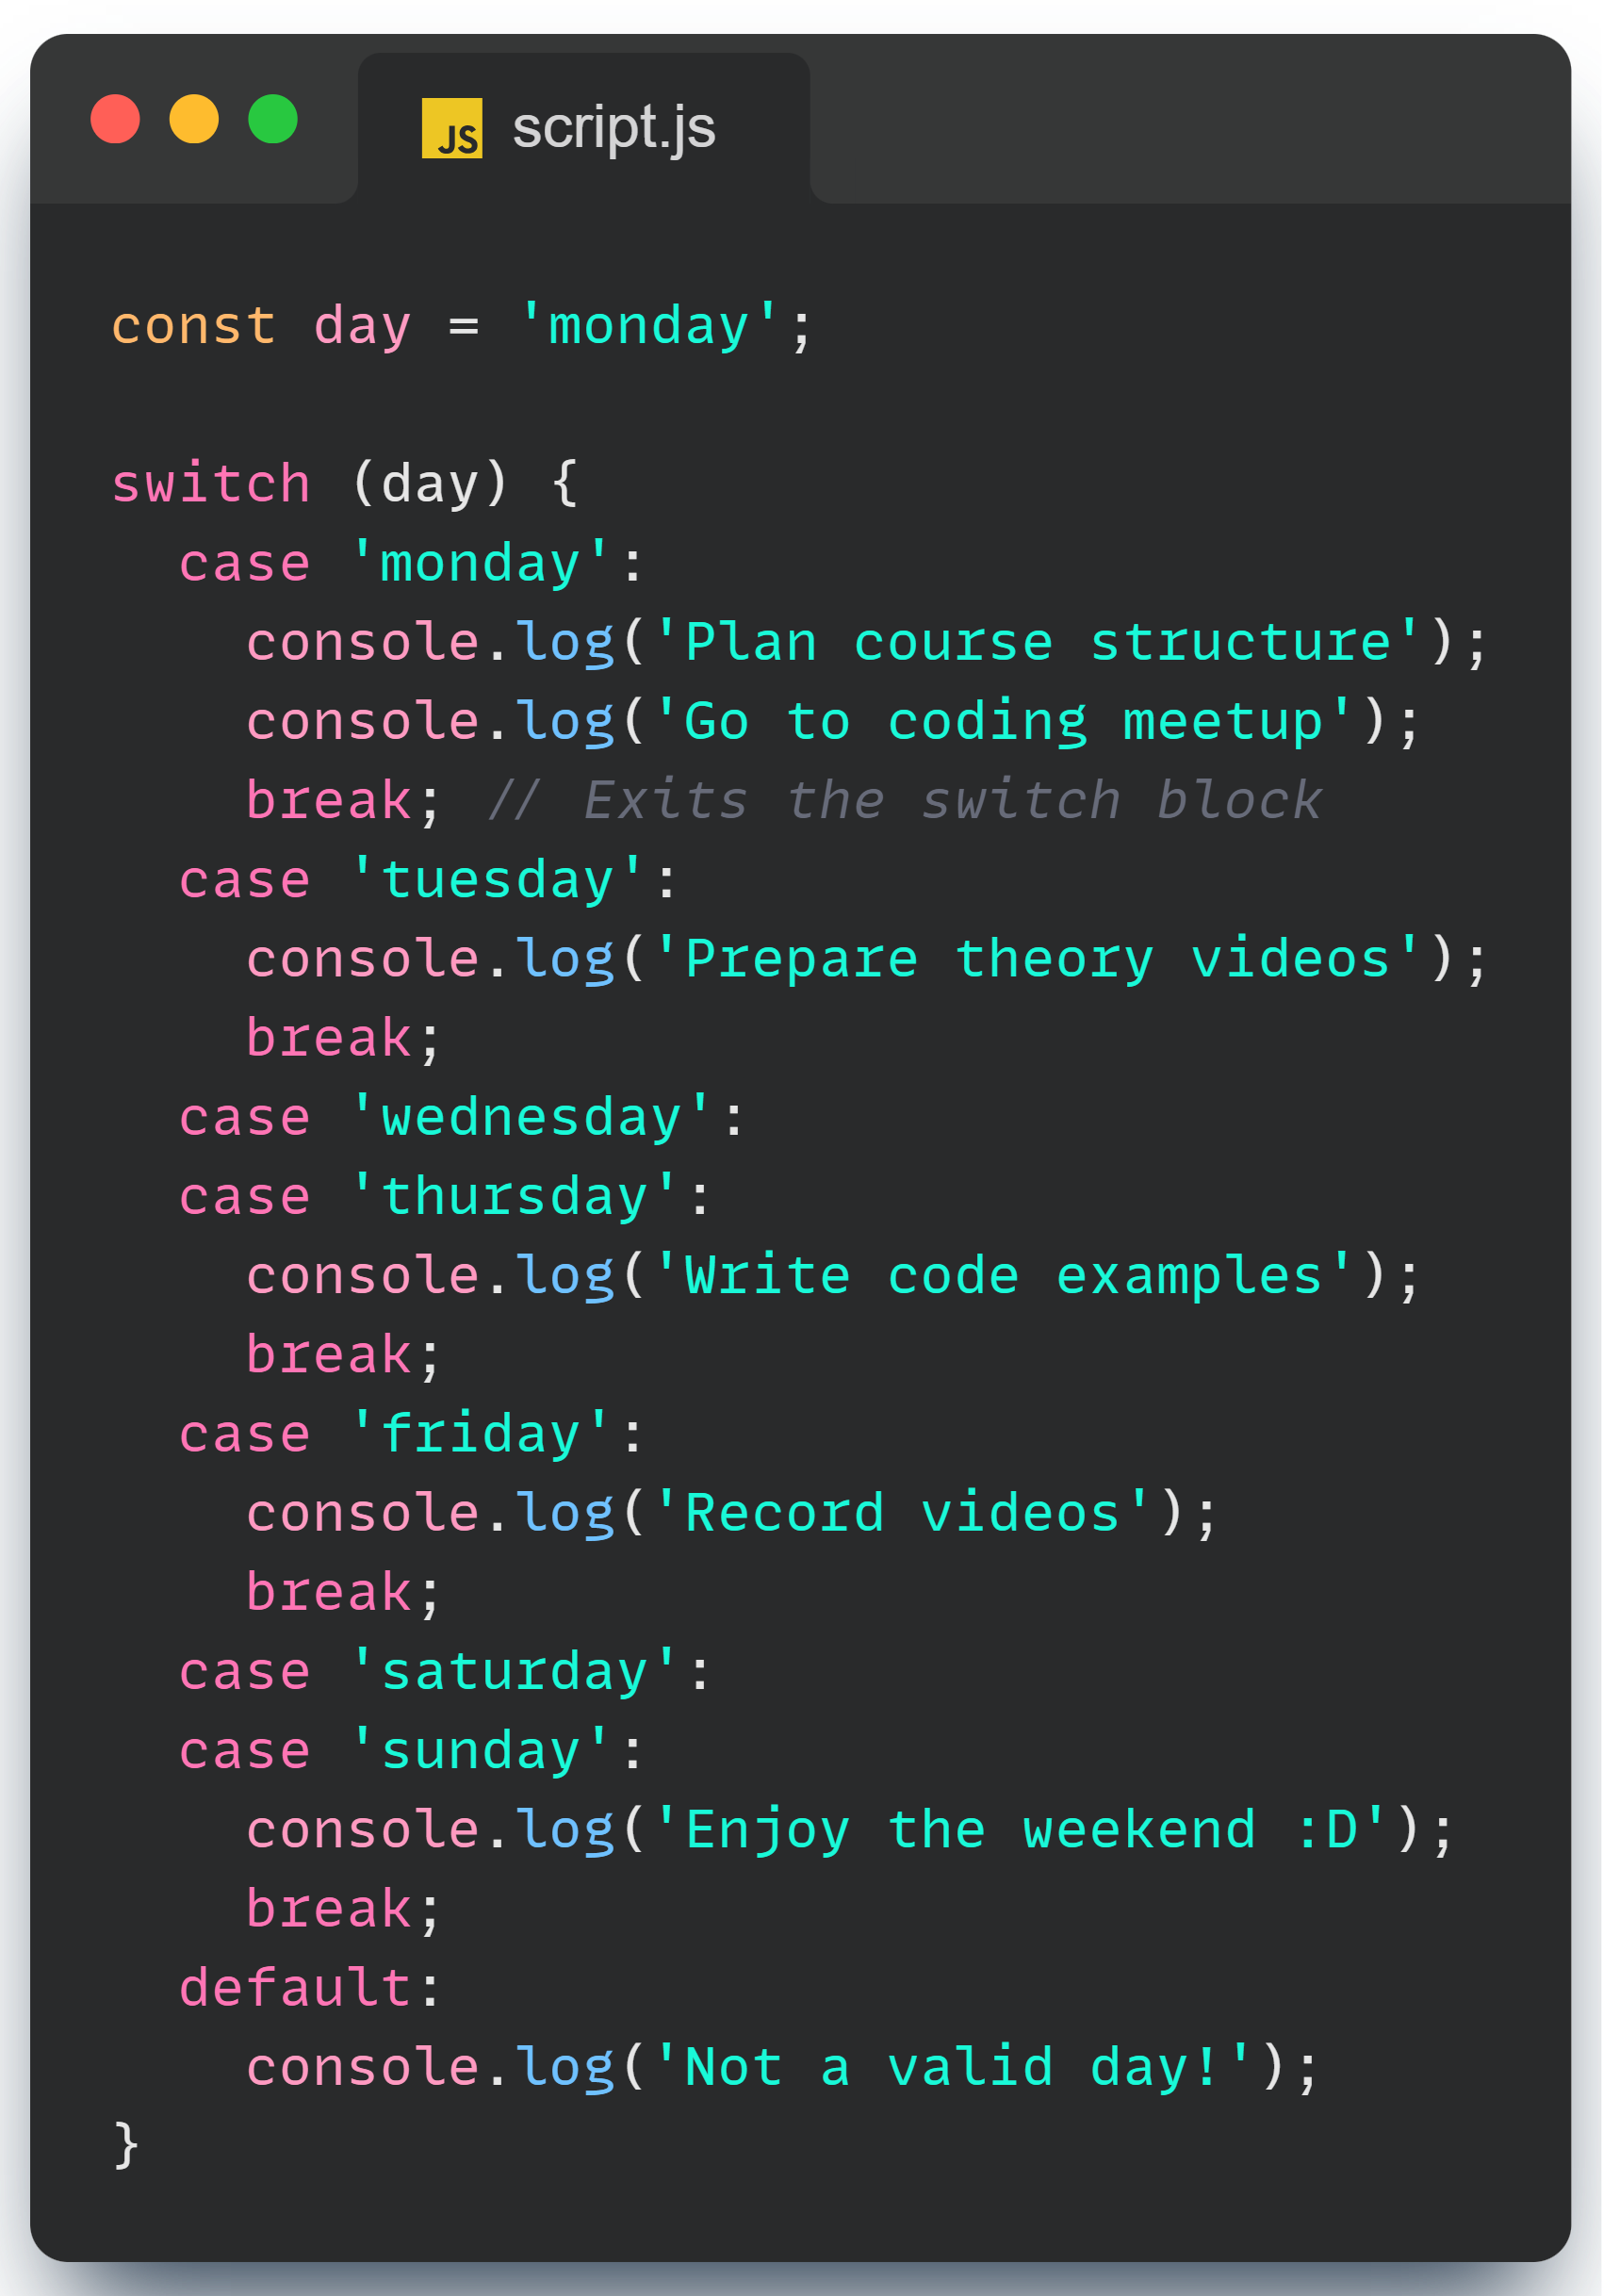
case 'monday':- This checks if thedayvariable is equal to'monday'. If true, the following code block executes until abreakstatement is encountered.break;- This statement exits theswitchblock to prevent the execution of subsequent cases.case 'wednesday':andcase 'thursday':- These cases are grouped together. If thedayis either'wednesday'or'thursday', the same block of code will execute.default:- This case is executed if none of the previous cases match the value ofday.
This approach is concise and makes it easy to see what happens for each specific value of day.
The If-Else Statement: Flexible but Verbose
If-else chains are another way to handle conditional logic. They’re more flexible but can become unwieldy with many conditions. Here’s how the same logic looks with if-else statements:
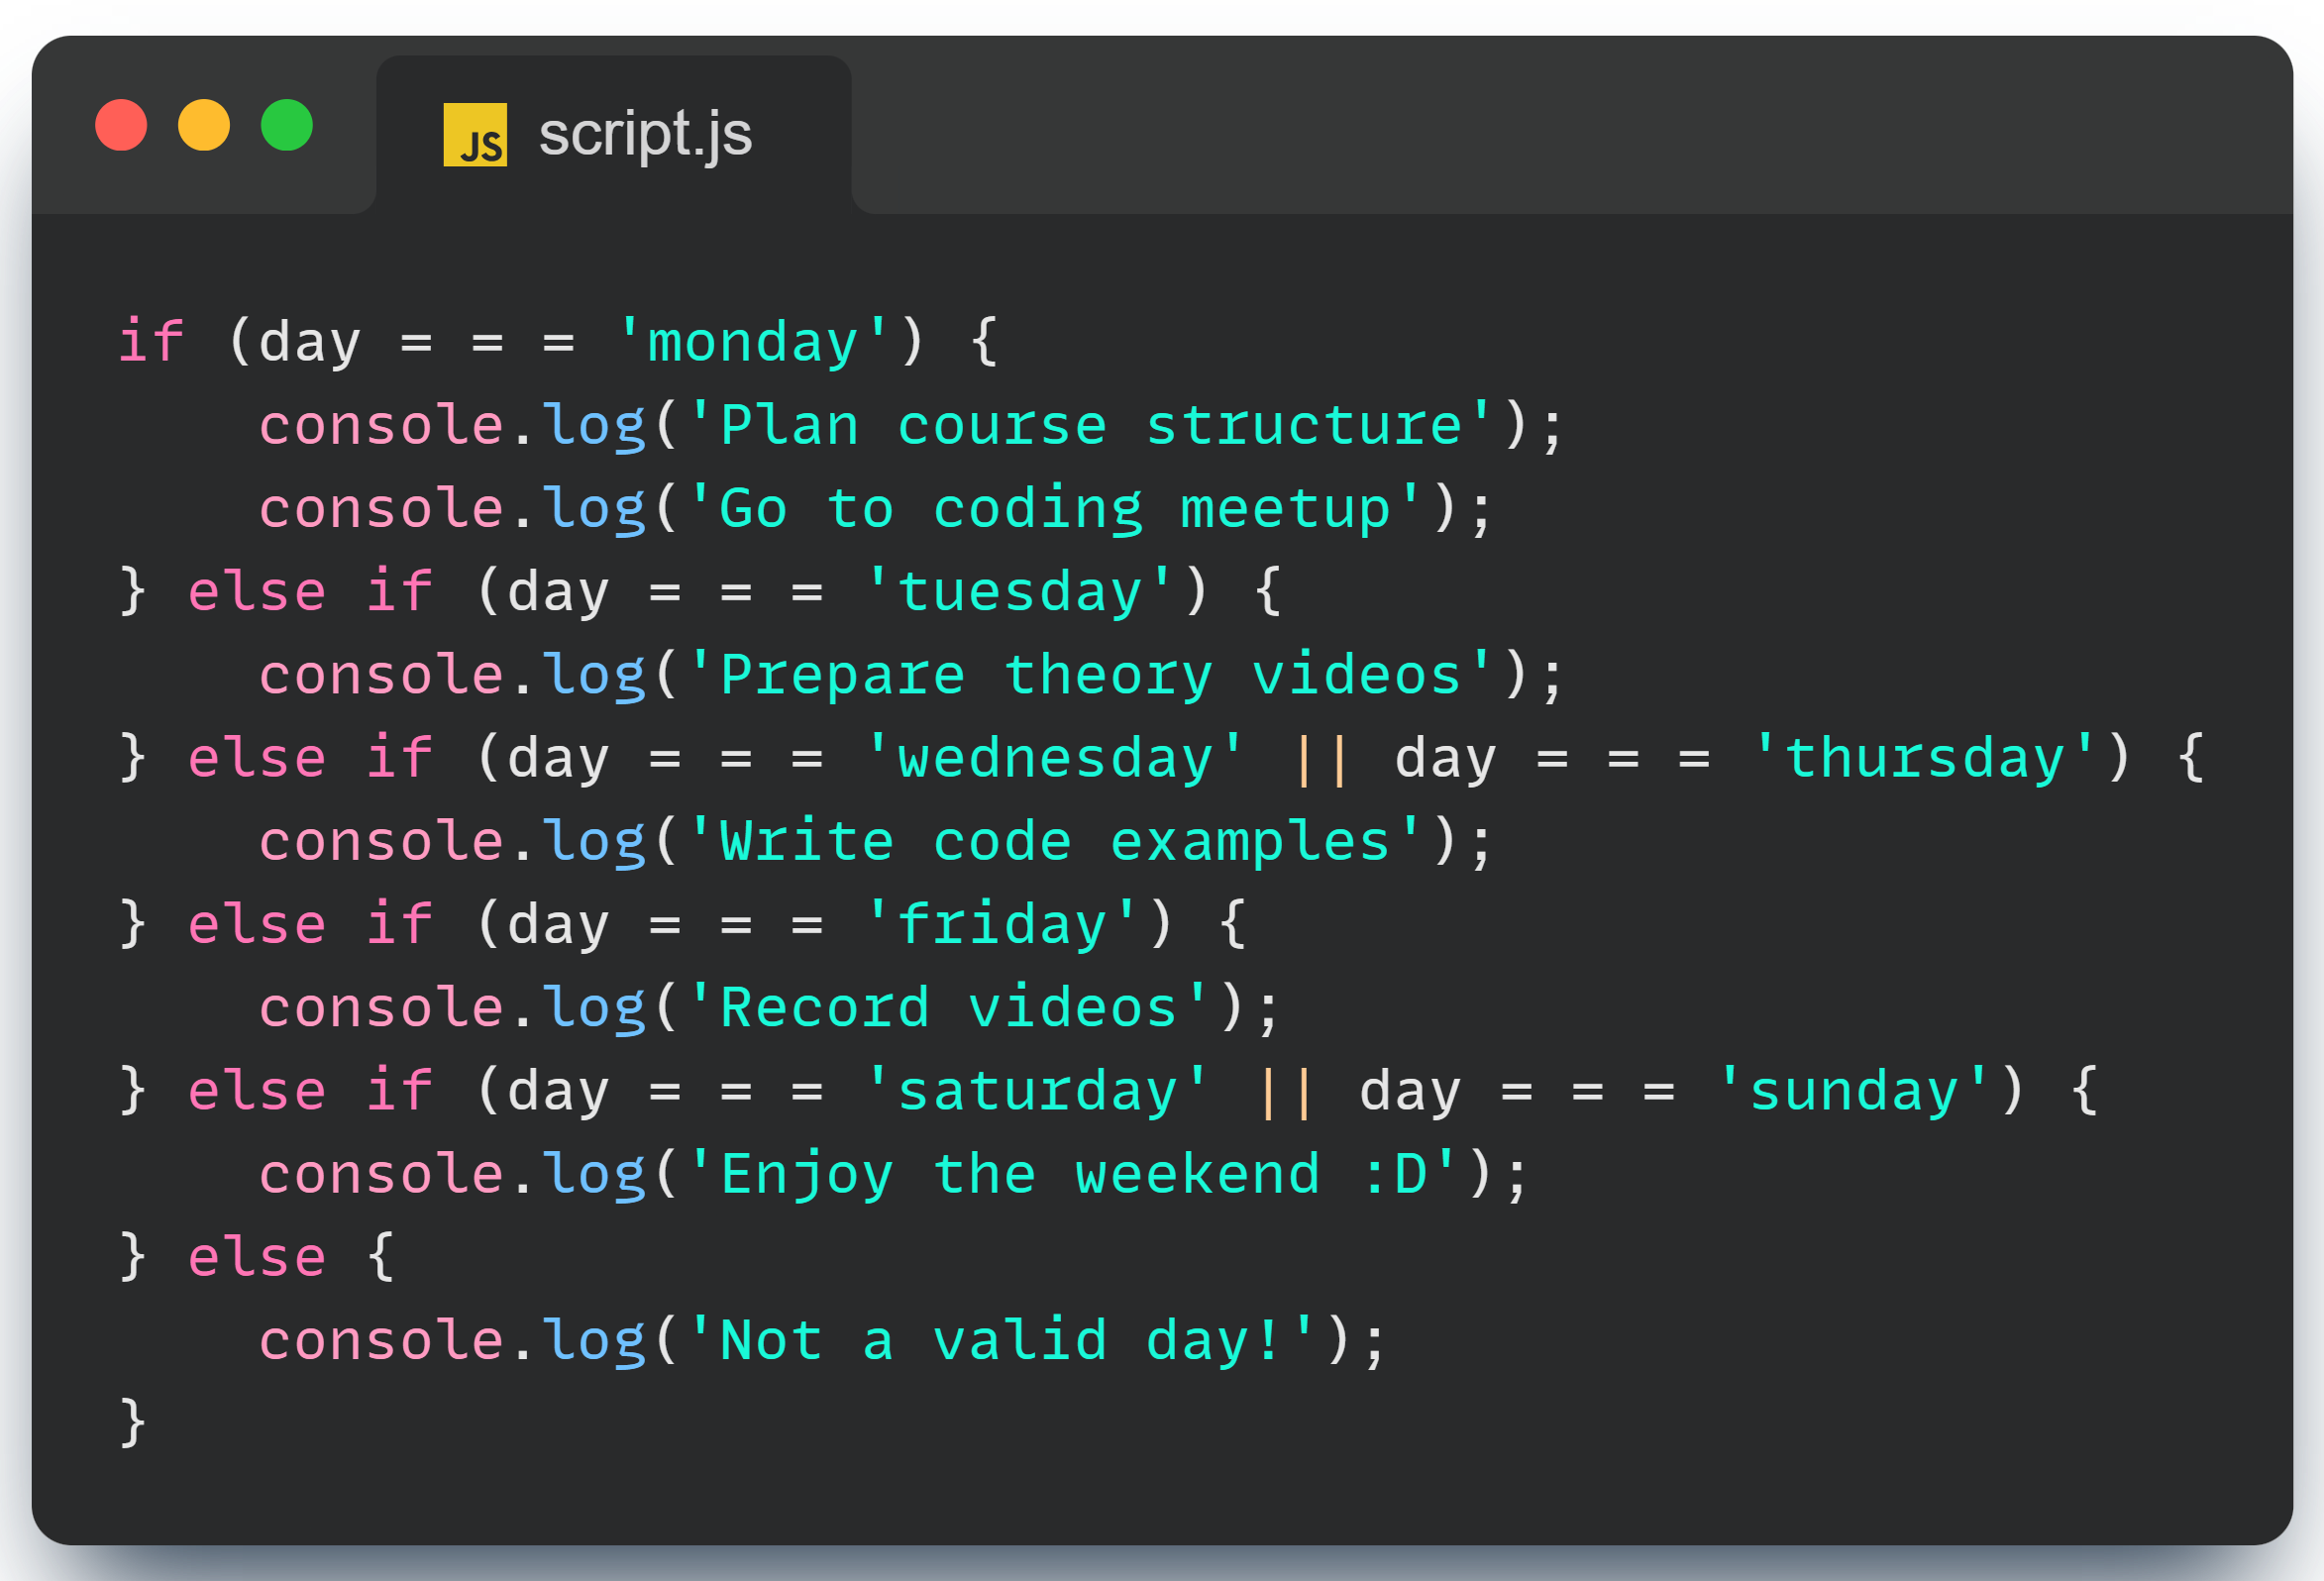
if (day === 'monday')- This condition checks ifdayis equal to'monday'.else if (day === 'tuesday')- This condition checks ifdayis equal to'tuesday', and so on.else if (day === 'wednesday' || day === 'thursday')- This checks ifdayis either'wednesday'or'thursday'. The||operator is used to check multiple conditions.else- This block executes if none of the previous conditions are met.
Note: switch always does a strict check! (checks both type and the value)
Which One to Use?
SwitchStatement: Ideal for handling multiple specific values in a clean and readable way. It’s a great choice when you have a fixed set of possible values.If-ElseStatement: Offers more flexibility for complex conditions or when conditions are not discrete values. It’s useful when you need to handle a variety of scenarios or when conditions involve ranges or complex expressions.
Both constructs have their place in JavaScript, and knowing when to use each can make your code more efficient and easier to understand. So next time you need to make decisions in your code, choose the tool that best fits your scenario and keep your code clean and maintainable!
Understanding Hoisting in JavaScript
Hoisting is a fundamental concept in JavaScript that affects how variables and functions are handled within your code. It can often lead to confusion, especially for those new to JavaScript. Let’s break down hoisting to understand what it is, how it works, and how it impacts your code.
What is Hoisting?
Hoisting is JavaScript's behaviour of moving variable and function declarations to the top of their containing scope during the compilation phase before the code is executed. This means that variables and functions can be used before they are actually declared in the code.
How Hoisting Works
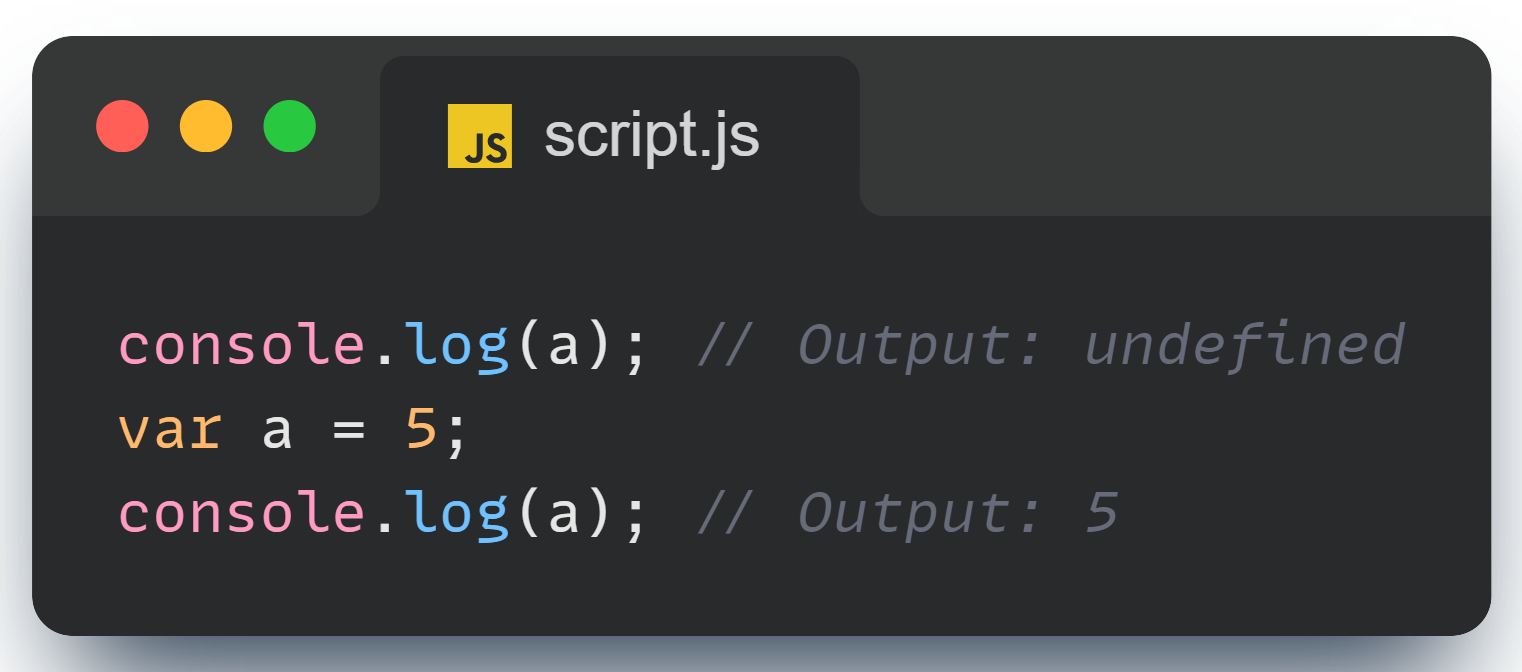
Variable Hoisting: Only the declaration part of a variable is hoisted, not its initialization. This means that variables are declared at the top of their scope, but their values are not assigned until the actual line of code where the assignment happens.

Image by author In the example above, the variable declaration
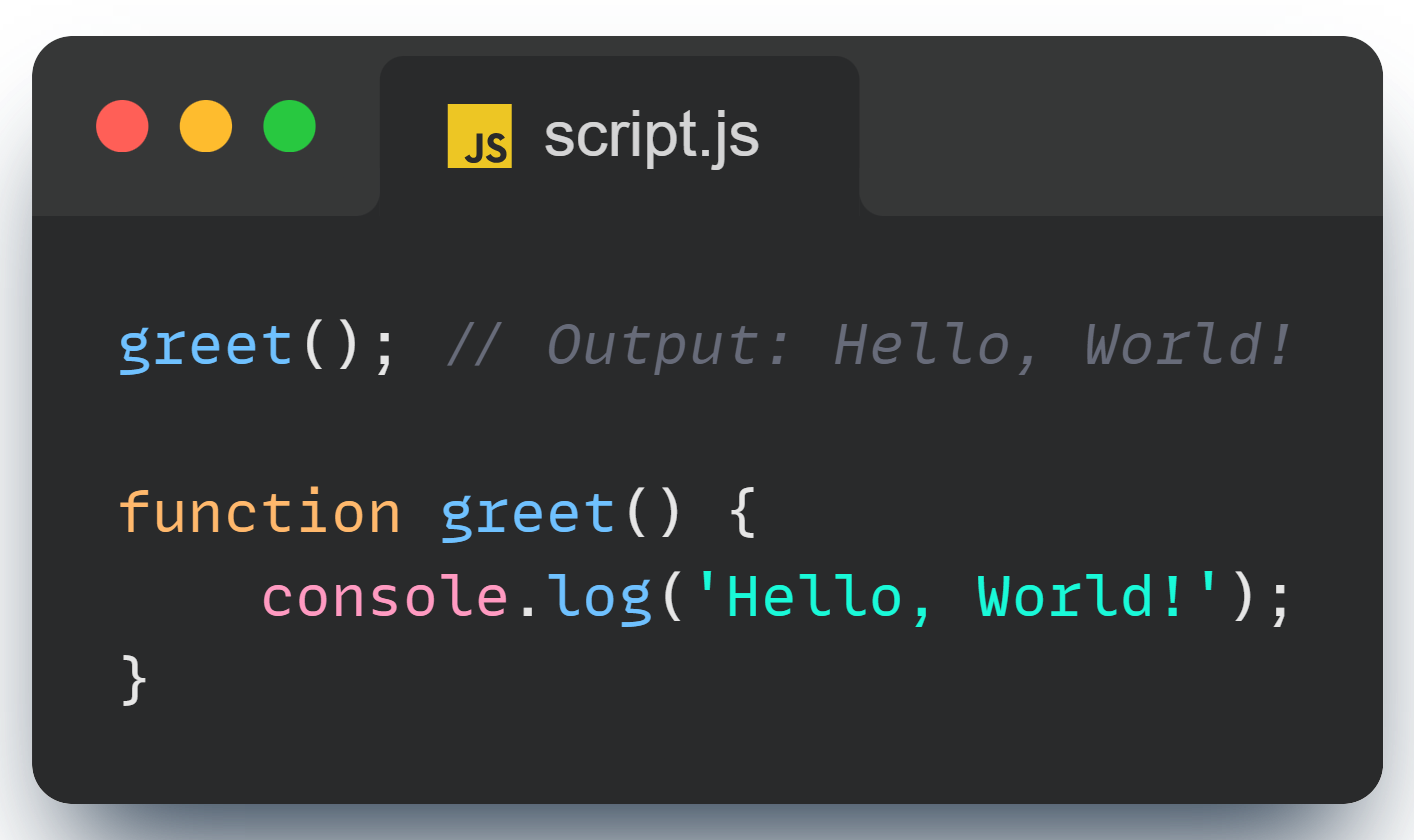
var a;is hoisted to the top, but the assignmenta = 5;is not. Therefore,console.log(a);before the assignment outputsundefined.Function Hoisting: Both function declarations and their definitions are hoisted. This means you can call a function before its declaration in the code.

Image by author Here, the entire function declaration
function greet() { ... }is hoisted to the top, allowing it to be called before its actual declaration.Let and Const Hoisting: Variables declared with
letandconstare also hoisted, but they are not initialized. They remain in a "temporal dead zone" from the start of the block until the declaration is encountered. Accessing them before the declaration results in aReferenceError.
Image by author In this case, even though
let b;is hoisted, it is not initialized until thelet b = 10;line is executed. Therefore, accessingbbefore the initialization results in an error.

Practical Implications of Hoisting
Function Declarations: Hoisting allows function declarations to be called before they appear in the code. This can be useful but might also lead to confusion if not understood properly.
Variable Declarations with
var: Since only the declaration is hoisted and not the initialization, you might encounter unexpectedundefinedvalues if you try to use the variable before its value is assigned.letandconstDeclarations: Hoisting forletandconstintroduces a temporal dead zone, making it clear that you cannot access these variables before their declaration. This can help avoid issues that arise from accessing variables too early.
Example of Hoisting with var and let
In this example:
The declaration
var a;is hoisted, soconsole.log(a);before the assignment results inundefined.The declaration
let b;is hoisted but remains in a temporal dead zone, causing an error when accessed before the initialization.
Conclusion
As we've explored in this article, mastering fundamental concepts like Strings, Type Conversion & Coercion, the switch statement, if-else statements, and Hoisting is essential for any JavaScript developer. These concepts are not just theoretical—they are the building blocks that enable you to write code that is both effective and elegant. Understanding how to manipulate strings, handle type conversions, and control the flow of your code with conditional statements and proper hoisting practices will elevate your JavaScript skills and help you tackle more complex problems with confidence.
In our next article, we'll delve into the basics of functions in JavaScript, covering everything from function declarations and expressions to arrow functions and higher-order functions. This deep dive into functions will further expand your toolkit and enhance your ability to write modular and reusable code. Stay tuned for a comprehensive guide that will set you up for success in your JavaScript journey!
Happy coding!